Hello guys, I’m Roselynn from Manicured and Marvelous. I’m really excited to be here, thank you so much Babi for having me. Today I have a really awesome, abstract, water marble using jelly polishes and combined with a cut-out design to show you guys. Normally I’d worry over having a neat pattern in the water but today we’re throwing that out the window. Put on your beret because it’s time to get artsy!


All the polishes that I’m using today are from CDB Lacquer’s new summer collection of jelly scattered holos. I find that the finish works really well for this type of design so try and grab some jellies for this. Before you get started here’s what you’ll need in order to accomplish this look :

1. Nail Vinyls, or cut out some tape, in the style you’d like to use. I’m going to be using chevron shaped nail vinyls for this tutorial.

2. Polishes, try to have at least 5 different colored ones. The ones I’m using are CDB Lacquer’s Foxy, Seductive, Attitude, Passionate, and Radiant.

3. White base color.

4. A cup, I prefer glass, of room temperature water.

5. A couple of toothpicks.


Start off with your favorite base coat to protect your natural nails. After your nails are dry, place a chevron vinyl, or tape, right down the middle of your nail.


Make sure all the edges are firmly pressed against your nail, and then proceed to cover your nail and the tape with a white polish. Don’t worry about cleanup at this point, trust me.


Now it’s time to play with your water, also known as, the really fun part. I let a single drop of each color fall into the water and spread. I did each color in a rotation twice but you can feel free to continue rotating if you’d like. You have to move quickly with this cause you don’t want your colors drying. In the photo below you can see steps 4 through 6. In step 5, after I rotate dropping the colors, I take a toothpick and move the colors around in the water. Kind of in a whirl/circle pattern and a little bit of zig-zag as well. Anything goes here guys. You can do lines back and forth or however you’d like. Remember, it’s supposed to be abstract and no two nails will look the same. In step 6, I dip my finger in the water for a few seconds before twirling a toothpick around the edge to pick up the excess polish.


This next step is where I start muttering curses to myself because I forgot to put either Vaseline or tape around my finger for easier cleanup. Cleanup isn’t as terrible if you move quickly and wipe away while the polish is still wet.


Before you clean up around your nail, however, use tweezers and pull away the tape or nail vinyl. Don’t worry if it smears a little here and there.


Add a topcoat and that’s all there is to it…


Or if you’re like me and need more ‘Pop!’ factor, add some studs or rhinestones.


What do you think guys? It’s really a fun worry-free mani that’s perfect for the summer time if you use bright colors. Doing your nails is always supposed to be fun so don’t worry about not being experienced with certain design elements. Throw some caution to the wind and try some funky things with your nails, you’d be surprised at what you come up with. Hope you’ve enjoyed the tutorial, I love to hear from you guys so don’t forget to drop me a line. Take care!

Roselynn
http://roselynn787.blogspot.com


Hello Colorsutraa readers,
I am super excited to take over... ummm... I mean contribute to Colorsutraa's blog while she's busy with her sister's wedding.  You've probably seen lots of nail art over the past few day's so I thought I share a super easy look that requires no nail art tools whatsoever! I mean, sometimes we just need a quick and easy mani that isn't boring!

I admit that I am a glitter addict.  I have more glitter top coats than I care to count and yet I still fine myself craving more.  I've learned to keep those craving under control by combining the glitter polishes I already have to create fun unique combos.


Zoya Skylar, Color Club Savoy Nights, Zoya Maisie and Darling Diva Polish Shop Till You Drop.

You will need a solid base colour and multiple styles of glitter polish.  I chose Zoya Skylar as my base because the shimmer is fairly subtle and will contrast with the glitter.  I then chose three different glitter styles to layer: CC Savoy Nights - a chunkier glitter, Zoya Maisie - a flakie glitter and DDP Shop Till You Drop - a micro glitter.  I find it looks nicest to layer your glitter starting with the largest/chunkiest and ending with the smallest.


  1. Paint your nails with your solid base colour. Use enough coats for it to be opaque and let dry. 
  2. Apply your largest glitter. For me this was Savoy Nights. I chose to sweep it up the side and across the nail tip but you could apply to the whole nail if you like. 
  3. Apply your medium glitter to the same area as the large glitter. For me this was Maisie. 
  4. Apply your micro glitter over the same area as the other two glitter. I used DDP Shop Till You Drop as my micro glitter.

Since you do have lots of layers I suggest using a thicker top coat to seal everything up.  I used Seche Vite for my manicure.  The result is a super sparkly unique glitter combo.  Photos of the mani were taken in natural lighting.


I really love how this combination turned out.  Even if you only own a few glitter toppers there is still the potential for tons of combinations.  Bonus - it's so simple and quick to do!  If you want to check out more of my nail polish adventures come and visit my in my natural habitat at www.thelazylaquerista.com.  I had lots of fun coming up with the post and I hope you enjoyed it too.

Happy polishing,
Michelle aka The Lazy Laquerista

Hello lovely readers, Leesha's Lacquer here, but you can call me leesh leesh, or leesha, or hey, whatever tickles your fancy.
The wonderful Babi has allowed me to guest post while she's away (and hopefully having tons of fun!) I'm super excited to show you what I have, since this is my very first guest post so let's get right in to it!


I decided to do something fun and colorful and something I've never tried before. I've been thinking about doing something like this for some time now. This design is something near and dear to me and is modeled after the beautiful, ornate flower art that my Ojibwe culture creates. I found a lovely Pinterest board here (http://www.pinterest.com/economiss/art-ojibwe-floral-and-similar/) that shows off tons of beautiful floral beadwork. 


I used my own nail polish, Leesha's Lacquer in Steel Mist as a base and migi nail art pens for the floral designs. I didn't plan the designs out, just creating what came to me as I went along. I think it turned out pretty decent, eh?

If you ever want to see what's up in Leesha Land™, you can find me at my blog
http://leeshaslacquer.blogspot.com/

or on Facebook
http://facebook.com/leeshaslacquer

I must thank Babi again for allowing me to guest post for you all to see. As always, have a BUNderful day! (Bunny jokes, I love em!)


Hey! Hey guys!

Let it be known that I spent about twelve years looking at pictures online of Indian things for inspiration for this post. Embroidered textiles, sari fabric designs, Indian architecture… and I loved all of it, but the amazing amount of detail that seriously seems to go into EVERYTHING I was seeing could never be replicated by me, Ms. Shaky McWobblehands, especially using nail polish. I wanted my nail art to not suck though because, uh, I like doing things that don't suck generally, and especially because I don't want to blemish the lovely blog that is ColorSutraa with my novice meh-ness. Hey… speaking of ColorSutraa, I sure do like the blog's color scheme and design… *light bulb*


Let's do water marbling, okay? Because I haven't before, and because I like to live life to the extreme. I tried making water marble stickers by letting the polish dry on top of the water before removing it in a fancy marbly sheet… nope. I don't know what the heck, but just no. I decided to suck it up and just do it, and I'm like, pretty okay with the result! I started off painting each nail with the mint green polish, then used a combination of polish and clear top coat for the water marble so the base color was present in the design since it was so goopy it refused to play nice in the water. Then, you know, dots. Then top coat, and studs, and BAM GIRL. ColorSutraa all over my nails.


I used Sally Hansen Xtreme Wear - Mint Sorbet for the base of each nail, and the water marbles were made using Sinful Colors - Forget Now (pink), Rain Storm (blue), Beatnick (teal) and OPI - Funky Dunkey (purple) with the dots on my ring finger being Funky Fingers - Gesso. I have about a billion of the hot pink studs so I was happy to finally use some of them for the design.

So there you go, friends. Thanks for reading!

Brandy,
Little Bottles of Love


Hi everyone! LacqueredMama here! First off I want to say how excited I am to be doing a guest post for Babi! She is such an inspiring blogger and I can only hope that my blog is as successful as hers one day! Thanks Babi!

Since we’re in summer time here in the U.S., I thought I’d show you 2 different manis; both using the exact same products, but with completely different looks. One a little on the crazy side and the other a tad more “everyday wearable”. For these looks I am combining two of my favorite summer time colors…..Nudes and Neons!

Before I show you the manis, I thought it would be helpful to share the products I’m using. From left to right, top to bottom, here are the items as shown in the picture below.


--Vapid Lacquer’s You’re So Dull matte topcoat

--Pipedream Polish Be My Flamingo

--Black, Purple, Aqua and Neon Pink acrylic paint

--OPI You’re So Vain-illa

--HK Girl glossy quick dry topcoat

--Pure Color No. 10 nailart brush from @stylishnailartshop

--Blue French brush w/ pusher from @joliepolish (this is my everyday cleanup brush)

--Basic double ended dotting tool purchased from Amazon

--Tweezers (used to hold and place my studs)


Obviously, you don’t have to use these exact products. Use what you have available to you, switch up colors, just have fun with it!

(Tip: I always put a coat of quick dry topcoat over my base before doing any nailart with acrylic paint. Because acrylic paint is water soluble, if you should make a mistake, you can simply wash the paint off the nail with water (you can also use hand sanitizer and wipe it off) without ruining the base color! Once I learned this, I felt like my whole life changed..haha! Best tip I’ve ever received!)

(Tip: I only had basic silver square studs available to me at the time, so I used my acrylic paint and simply painted the studs the colors I wanted!)

First up is the wonderfully crazy and bright neon and nude skittlette mani! Now, I am not a tutorial guru and I am horrible at videos, so I like to share little pictorials on how to create designs. I often use a nail art template (these can be found online by just doing a google image search for “nail template”. I found mine on the following blog: www.lavendarstarnails.blogspot.com

The first pictorial shows you the entire mani design I came up with:


The next pictures will show you the steps I took to create each design:

________________________________________________________________________

________________________________________________________________________

________________________________________________________________________


Basically I do things in this order: base color, quick dry topcoat, acrylic paint design/glitter toppers, topcoat (matte or glossy), studs. For this particular mani, I used the matte topcoat to finish it off!

Waaaalaaa!


Now here is the more subdued, not so in your face design. A neon and nude waterfall design, with two glitter/stud accent nails! This one is definitely more my style and the waterfall was one of the first nailart designs I ever tried. You can check out @thesammersaurus on instagram, which is where I first fell in love with it. She also has a YouTube channel with a tutorial.

Again, first up is the entire mani design:


And here is a pictorial of how to do the designs:


________________________________________________________________________


Again, I do things in this order: base color, quick dry topcoat, acrylic paint design, topcoat (matte or glossy), studs. For this particular mani, I used the glossy topcoat to finish it off!

and......


And there you have it! I hope you all enjoyed my very first guest post! Leave a comment down below and let me know what you think! You can also check out my blog at www.lacqueredmama.blogspot.com and I can be found on instagram @lacqueredmama!

Thanks for reading!


Xoxo, LacqueredMama


Nail Art Newbie - A First Attempt

I'm thrilled to be here filling in on ColorSutraa from my usual gig as The Polished Hippy on Facebook. Now, for the most part I stick to plain jane manicures as I get mesmerized by the colors and am happy to wear one shade at once. But my assignment for this mission was nail art, so I thought why, not, time to try something different. So dear readers, you get to see my very first attempt at dotting! I went into this with a big 'ol security blanket in the form of some of my favorite holo polishes by Glittering Elements, Glitzkrieg War Paint, and Too Fancy Lacquer, so this shouldn't hurt too bad, right?

First of all, I'll show you why I love dot manicures so much. I've been collecting antique Venetian beads since I was a kid and some of my favorites are known as "eye beads" in the trade. The part of Venice called Murano was at the center of the glass business since in the middle ages and beads such as these were sold all over the world. They were produced by melting glass canes around wires over open flames, hence the term "lampwork" for this method. The dots on manicures always reminded me of my beloved "eye beads."


Next, let me show you the colors I used. My base was Glitzkrieg War Paint Emerald, a glowing, translucent green jelly holo.

Glitzkrieg War Paint Emerald 


Dots were done with Glittering Elements Voodoo Dolly, Angelica (a Norway Nails exclusive) and Ruby, and Too Fancy Lacquer Rosé By The Dozen, Lake Como, and Come To the Dark Side.


Glittering Elements Voodoo Dolly, Angelica, and Ruby

and Too Fancy Lacquer Rosé By The Dozen, Lake Como, and Come To the Dark Side.


I decided to try a different design on each nail, like a sampler, to learn how it worked and see how the various polishes performed. Some of them turned out a bit better than others, but hey, I'm learning something new! This is not something I would probably wear all at once, but it was a great way to experiment.


I'm pretty happy with how the pinky finger came out, with slightly graduated dots on an angle. Maybe I'd give myself a B on this one. 


The simple combo of pink and purple on the ring finger worked color-wise, but let's just say I could use a bit more control over my dot size and shape. A C+ perhaps? 


The middle finger was not a win in my book. One of the dotting colors is a bit too dark for the base and the other is not quite opaque enough. Blah on the whole. A D+. 


The index probably turned out the best of my random dot nails, with a total of three colors for variety and different size dots. Having enough contrast between all the colors used made it pop more. This one is a B-. 


I saved the best one for last! The thumb gave me a bit more room to work and I loved the curved lines of dots in different colors. This one I might try again, but only using the most opaque colors. It's a B+ I would say. 


I hope you enjoyed my first tentative journey into nail art as an adult. I did all kinds of experiments as a kid, but I doubt many of them were quite presentable. I don't think I'll be dotting or doing other types of nail art as a stable of my mani repertoire since I tend to prefer simple things on my nails, but I would like to improve my skills. Hats off to all of you who have mastered nail art, and for those of you who were timid like me, give it a chance, it's only a little scary at first!
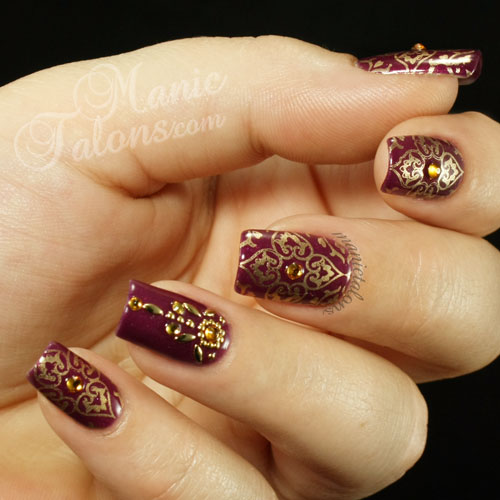
Hello lovely ColorSutraa readers! I'm Michelle, and I'm the voice and hands behind Manic Talons. I'm so excited to be here posting for Babi while she's in India! I've had this idea in my head for an Indian Wedding Sari inspired manicure, and this seems like the perfect time to do it. Nothing quite like starting a rumor by mentioning a wedding in a guest post, right? Hopefully Babi won't hunt me down and beat me for it. ;)

Indian Sari Manicure, IBD Just Gel Indian Sari


My "thing" is soak off gel polish, and I had the perfect gel in my stash for this mani. IBD Just Gel Indian Sari is a gorgeous, shimmery purple and the name just screamed "use me"! This shade is also available in IBD Nail Lacquer. I haven't personally tried the IBD lacquers so I can't say how they stack up, but the gels are some of my favorites. I then stamped with Maybelline Bold Gold and an image from the Cheeky European Romance plate. Bold Gold is hard to find now, but if you happen to have it in your stash or run across it, it is the absolute best gold I have found for stamping. I've hoarded backups for my backups. I finished off the stamped nails by adding a few ss6 gold crystals to the centers of the images. The accent nail is my favorite part of this manicure and I think drives home that wedding sari feel. After all, Indian wedding jewelery is very elaborate, right? Let's take a closer look.

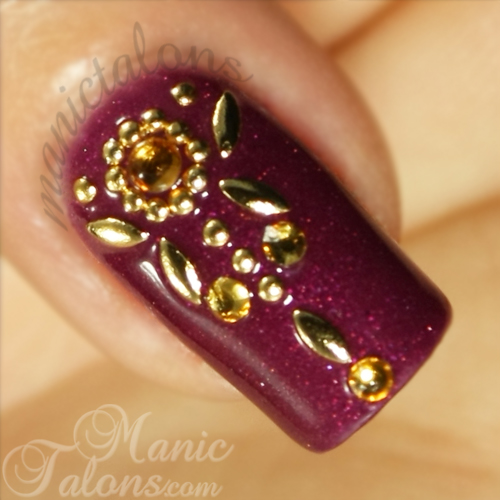
Indian Sari Inspired Nail Art, IBD Just Gel Indian Sari


For this stud and crystal design, I started with a gold ss6 flatback crystal. I then created a frame around the crystal and added accents with tiny 1 mm studs and leaf shaped studs from The Nail Room. I adore these tiny pieces and have used them a lot lately in various designs. They are a little pricey, but they're completely reusable! Just remove them from the nail, clean them up with a little bit of acetone and they're ready to use again. I finished it off with a few matching gold ss4 flatback crystals. What do you think? Did I nail the Indian Wedding Sari design? Want to see another shot?

Indian Sari Nails, IBD Just Gel Indian Sari


If you're a fan of gel polish or nail art in general, I invite you to pop over to Manic Talons and poke around my Swatch Galleries and Nail Art Gallery. Thank you, Babi, for inviting me to post today! ~Michelle
Back to Top