*Previously provided for review

Hi there everyone!! My name is Dani and I run the blog From Polish, with Love! I was so flattered when Babi asked me to do a guest post for her while she is away for her sister's wedding! I've known Babi through blogging for a while now and she is the sweetest person with the most gorgeous nails!! We also share a love for food too ;-)

A little bit about myself before I show you my creation!! I'm a SAHM to two little boys, aged 3 1/2 and 1 and I've been blogging for 2 1/2 years now!! I LOVE NAIL POLISH but that shouldn't be news to you ;-) I swatch and do nail art with an occasional makeup look thrown in since I have just as much makeup as nail polish.

For today's nail art I decided to do something using all of the Keys Collection from Barielle for summertime. All of the shades in this collection are so complimentary with one another and I kept thinking how I could incorporate them all into a look.

I came up with this :-)


Wavy-nail-art-with-Barielle-Keys-Collection


I wanted something reminiscent of a sunset but in abstract form so I just went with it! I had it pictured in my mind how I wanted it to look and I'm pretty proud of the result!!

I started off with 3 coats of Panama Pina Colada, a pale banana yellow. Starting off near my cuticles, I took Topless in St. Tropez ( wooo! ) and made a curved line across my nail but not going all the way down to my tips. The concept of this was to not have any rhyme or reason but to just go with it! I didn't want uniformity, just some wavy lines continuing down my nails!! I followed by doing random overlapping lines with Barefoot in Bermuda, Hawaiian Sunset, Paradise in the Tropics, and finished off with Miami Heat in that order. I needed 2 coats of Miami Heat since it's a jelly and wanted my lines to be more opaque. After letting this dry for a few mintes, I applied Sally Hansen InstaDri top coat. You definitely want to wait a bit before applying top coat so you don't smear your design.


Wavy-nail-art-with-Barielle-Keys-Collection


I love when a collection comes out and every polish looks so good together! I really don't think this would have jived as well if a teal or blue was thrown in there. I love the ombre effect that this conveys!!


Wavy-nail-art-with-Barielle-Keys-Collection


If you enjoyed this post and want to see more, please be sure to follow my blog here! I'm also on Instagram and on Facebook too and would love for you all to follow me on there as well!!!

The Keys collection and other polishes can be found on Barielle's website here. They don't have it listed as a complete collection but you can purchase the individual polishes for $8 per 13.3 mL bottle.

Thanks again to Babi for having me!! I hope you are having a blast with your family, darling!!!!!


Hi there, my darlings! Today, I have for you my review of 3 of Sally Hansen's eagerly anticipated Color Foils collection. I was super excited to try these from the minute I saw the press release and even more excited when three gorgeous shades landed up on my doorstep!

Before we get into swatches and even a little bit of nail art, let's talk about the formula--these are opaque and beautifully pigmented at one coat, yup! Just ONE coat. Not only that but they dried super quickly and applied pretty well, though being metallics, I found a generous bit of polish on the brush helped more with a smoother, less streaky application. All the swatches below are just one coat by itself, shown without base coat or topcoat, as they were designed to be worn. The only drawback to these polishes is that, if like mine, your nails are flawed in anyway, i.e., peeling, ridges, dents etc, these color foils seem to accentuate those flaws. I suggest gently buffing your nails before application.

Okay then, on to the swatches!

Leaden Lilac is a dusky, almost denim blue with a chrome-like, metallic finish and distinct purple undertones. Given the name, this polish was a complete, albeit totally pleasant, surprise! I love this shade of blue!


Minted Metal is a minty/sea green with a chrome-like, metallic finish and a slight blue undertone. This is a green that even I would be happy to rock!


Yellow Gold is a is a rich yellow-toned gold with a chrome-like, metallic finish and a hint of a green undertone. This shade reminds me so much of the burnished, antique gold jewellery that my bride-to-be sister loves! And, as you'll see in just a bit, it's a great base for a little bit of nail art!


Using Yellow Gold above, I decided to create a nail art look I've been contemplating! I absolutely love photos of the leadlight technique that I've been seeing on Instagram but since my stamping skills are still pretty dismal, I found a little way to get around this and still achieve a similar look! Take a quick peek at the items I used :


  • Sally Hansen Nail Art pens in green, neon pink, red and purple
  • Lace nail art decals

The process was fairly simple. I used a base of Yellow Gold and then applied the strips of lac decals to my nail tips. After trimming off the excess from the sides, I smoothed them down with a nail brush. Finally, I filled in some of the areas, such as the flowers and leaves with the nail art pens. Super simple!...and here are my results!


If you would like to pick up any of these beautiful Color Foils for yourself, you can find it at your local CVSRiteAidWalgreensWalmartKmart or Ulta (among other fine retailers) for the price of $7.99 (prices may vary in different states). Remember to follow Sally Hansen through the social media outlets below to learn about their latest products :

Facebook
Instagram
Twitter
Pinterest
Youtube
Website

Will you be picking up any of these three to add to your stash? I'd love to hear your opinions in the comments section below!


Until next time,
<3
B


****Products were sent to me for an honest, unbiased review. All opinions are my own.****


Hey everyone! My name is Ida from Ida Nails It and I am happy to be a guest poster for Babi here at ColorSutraa while she is gone. The subject for today's post is not about a particular brand but more about nail art. I have only more recently gotten into the oh so wide world of nail art but I have really come to love this form of nail expression and especially line or tape manicures. Much of the time I will cut pieces of striping tape to form designs but you an also purchase already cut sets of nail vinyls to create your design. There are a many shops out there but I purchased my set of nail vinyls from this shop: Nail Vinyls

When using nail vinyls, you can either start with bare nails and go for a negative space look or apply a colored polish as your base. Make sure that if you are using a base polish, you apply a quick dry top coat and completely let it dry. You don't want to have smeared nail or to lift up the base polish when lifting the nail vinyl. The ones below that I worked with are the mini chevrons, straights, and lightening bolts.

Once your base color has completely dried, you will take separate pieces of the nail vinyls and place them in the design you like on your nails.

Important: once you have applied your polish over the vinyls, quickly and carefully remove the vinyl from your nail. As polish dries quickly, if you wait too long to lift the vinyl, you risk smudging and/or lifting more polish then you intended.

Lifting with tweezers will help so much more than attempting to lift the vinyls with your other hand. I have a set of tweezers set aside just for the purpose of using nail vinyls and striping tape and can not recommend enough doing that!


Mini chevrons! 

I applied Wet n Wild French White as my base color and then American Apparel Manila and Santorini layered over.

The colors are somewhat vintage to me and I like the combination of a muted blue and yellow.


Straights!

Again, I applied Wet n Wild French White as my base color and then American Apparel Hassid, and Sinful Gel Tech Bananappeal to create a bee worthy look. BZZZZZ~~


Lightening bolts!

I applied Elevation Polish Cerro Torre 2 as my base color and then from fore finger to pinky I applied Color Club Psychedelic Scene, Lava Lamp, Youthquake, and Mrs. Robinson.

I love the look of neon and nude and this a nice way to combine the two.


I hope you like these three looks using Nail Vinyls. The options are endless really as to what you can do with these. You can purchase them from Nail Vinyls directly and follow her on Instagram for updates.

Thank you readers! If you enjoyed my post, check out my blog as well as my Facebook page, Instagram, and Pinterest. And special thank you to Babi for having me!


Hi, my darlings! I have some fabulous news to share with you all today! If you're a fan of the uber popular boy band, One Direction, well, you're in luck! Here's your chance to not only win a pair of tickets to their upcoming show in Massachusetts but also be one of the first people to check out (and possibly win) products from their brand-new makeup line! Read on for more details!
About the Product

Make-up by ONE DIRECTION: 

The irreverent attitude and colorful style of a new generation takes on a glamorous form in Makeup by One Direction. The world’s biggest pop band debuts a limited-edition cosmetics collection by Markwins International, launching mid-August 2014 at Macy’s and select other major retailers worldwide.

Much like the One Direction band members themselves, this prestige makeup line is fun, bold and a tad mischievous, featuring vivid shades, premium formulas and chic, collectible packaging and components.

A range of makeup and cosmetic products celebrating youth, style, and the uninhibited lifestyle of a new generation. Celebrating life with bold shades, unique formulae and infused with limited edition collectable packaging, Makeup from One Direction is fun, bold, often irreverent, with a touch of cheeky mischievousness. Offered at prices that every girl and woman can afford.

Giveaway:

Each winner will receive 2 tickets to the One Direction "Where We Are" Tour Concert at Gilette Stadium in Foxborough, MA for Friday, August 8th, 2014, at 7:00pm. Transportation to/from the concert and lodging not included.

Winners will also receive 2 Make-up by ONE DIRECTION limited-edition collections of beauty essentials, housed in a collectible keepsake tin. Inside is everything you need to rock all your beauty looks on or off the stage. The 2 makeup tins will be randomly selected from the 3 available collections (Midnight Memories, Take Me Home, or Up all Night). Details on the 3 Looks Collection tins HERE!


***SCRIPT IN ITALICS PROVIDED BY THE SPONSORS***


So there you have it, my darlings! You can enter this giveaway through the widget below OR through the online form HERE! For more information on One Directions limited edition makeup collections, visit them on Facebook.


Good luck, my darlings!

<3
B


***Powered by Brandbacker***


Hi, my darlings! Today, I have a review of another fabulous product that I have tucked away and brought with me all the way to India--I'm talking about Perlier's Shea Butter White Lily Hand Cream available from HSN. When I got an opportunity to review this product through my iFabbo network, I knew it would be perfect to carry with me for hand and cuticle care while I was preparing for all the wedding festivities because I've heard so much about the beneficial effects of shea butter.


As always, let's take a quick look at the product description :

Perlier Shea Butter with White Lily Hand Cream 

How do you define luxury? A bottle of your favorite wine? Egyptian cotton sheets? What about the feeling of soft, moisturized, pampered skin? With this sumptuous shea butter duo, you don't have to be wealthy to indulge yourself in the luxurious things of life. Welcome to Perlier. 

Fragrance Notes :

Top: Lemon, crunchy green apple and lily of the valley
Middle: Rose petal, peony, peach flowers and white lily accord
Bottom: Cedarwood, white musk and shea butter accord

Shea Butter Hand Cream with White Lily Extract :

Formulated with 100% organic shea butter and extracts of white lily
Soothing and emollient properties
Grants a smooth appearance to the skin

*Script in italics is the company's own description*


USE : I've been using this product exclusively while I've been here in India. Every night before bed, I use a tiny dollop about the size of a dime and massage it into my hands, paying close attention to my cuticles--a little goes a long way with this product.

IMPRESSIONS : First of all, this hand cream smells divine! The fragrance was very well-loved by every single person in my family who tried it. When describing the texture, the words rich, luscious and indulgent are the first that come to mind. That being said, this hand cream is not well-suited to warmer climates--it's so thick and creamy, it doesn't work as well in the scorching humidity of India. However, I can totally see this becoming a staple in my stash when I'm back in the US--it'll be just fabulous for the cold winter months that ravage cuticles so brutally!


So there you have it, my darlings! If you would like to pick up your very own tube, you can find Perlier's Shea Butter White Lily Hand Cream on HSN HERE for the price of $24.00 for a full-size, 6.7 fl oz, plus shipping and handling. And guess what, my darlings?! Perlier will be featured on HSN TODAY AND TOMORROW, that is, July 24th and 25th so don't forget to check them out!

To discover other great products or to learn more about this one, you can follow Perlier through the outlets below :

Facebook
Twitter
Pinterest

Will you be adding this product to your stash? I'd love to hear your opinions in the comments section below!


Until next time,
<3
B


****Products were sent to me for an honest, unbiased review. All opinions are my own.****
Greetings! This is Jen from The Jedi Wife, and I am honored that my friend, Babi, would ask me to write up a post for her blog! I've been doing a little bit of nail art on my blog recently in addition to product reviews, so naturally I opted to do some nail art for this post. After wracking my brain and only coming up with partially thought out ideas, I asked Babi what she would like to see me do. Her challenge: holos and dots. I love holographic polishes, and I love dots, but I wanted to add my own little spin on the idea. I present to you my take on her challenge- holographic dots in a jelly sandwich!


I chose this specific combination because I don't think I've seen jelly and holographic polishes combined in such a manner before, and I wanted to know how it would turn out. This manicure is a little different from what I normally wear, but I must say, I'm really liking it!


I knew I wanted to use a couple coats of Zoya Coraline, my jelly polish, and I wasn't sure how much it would conceal the colours underneath. After my base coat dried, I applied my first couple of dots on each nail using the colours Different Dimension Gasoline Rainbows and Lilypad Lacquer Fire Fire with a dotting tool. Once dry, I added my first coat of Zoya Coraline. After the jelly polish was dry, I added more dots, this time using Colors by Llarowe My Big Girl Panties and Literary Lacquers More Like Fire Than Light. Once dry, I added by second coat of Zoya Coraline. I then topped the jelly sandwich with a few more dots of Gasoline Rainbows, My Big Girl Panties, and Catherine Arley 806. My final step was to add HK Girl top coat.


To be honest, this manicure is not exactly how I pictured it in my mind, and I was pretty sure I hated it at first. I definitely changed my opinion on that after wearing it a little longer! I definitely want to try this look again using other colours!


I hope you enjoyed my post! Have a wonderful day!


Hi there, my darlings! As most of you know by now, I'm in India, preparing to celebrate my baby sister's wedding and boy! What an extravaganza that will be! Knowing that this wedding and the days immediately preceding it will be super hectic and I'd be facing a drastic change in climate, I brought along several items with me to give my poor, beleaguered skin a little bit of much-needed TLC. Today, I want to share with all of you my experience with one of these products--The Skin Regime book and 1-4-ALL peel from Dana Ramos.


First, let's take a quick look at the product description of the peel and what Dana claims this product can do for your skin :

THE MOST AMAZING PEEL. PERIOD.

The 1-4-All Peel, by The Skin Regime is the only peel you'll ever need. It is one peel for all skin types, one peel for all people, it is truly the 1-4-All Peel!

One layer = mild peel

Two layers= moderate peel

Three or four layers= strong peel


And what about the book? Let's take a peek at that product description too :

The Skin Regime : Boot camp for beautiful skin

Now Available on Amazon.com, as paperback and on Kindle.

Now in its 2nd edition--updated and expanded! This best-selling book presents the truth about skincare and the lies from the beauty industry. Bottom line--You CAN reverse sun damage and aging and get fabulous skin with a routine you create at home, using inexpensive products available at drugstores or on-line.

We show you everything to get glowing, great, healthy skin--all over your body.

*Script in italics is the company's own description*


USE : The peel comes with a stringent set of step-by-step instructions, which I, being an absolute novice to chemical peels, followed to the letter. First, I cleansed my face with mild soap and water. Then, I prepped my face with a cleansing towelette from Yes to Cucumbers--this facial wipe is hypoallergenic and works wonderfully for my sensitive skin. Once my face was squeaky clean, I moistened a cotton ball with the peel and applied one thin layer of it to my face and neck, avoiding the eyes and the sensitive corners of my nose and mouth. I waited about 5-10 mins for the peel to dry completely and then washed my face with cold water and a mild cleanser. After patting dry, I immediately applied moisturizer.

IMPRESSIONS : I have to admit, despite the copious amounts of instructions I received with my review sample, I was a bit nervous about using this product. I mean, a chemical peel and that too at home? This is my FACE we're talking about! But I swallowed my hesitation and tried this peel...and let me tell you, I'm floored! I expected some serious irritation since my skin can be so finicky and sensitive but once applied, I felt nothing but a little mild discomfort, almost like an itch. Once I washed my face clean, my face looked absolutely RADIANT! Glowing, smooth and firm. The humidity has been brutal to my skin and I have endured acne that I haven't seen since my teenage years but I swear, one use and even some of my older acne scars looked somewhat faded. Can I just say...SOLD! I fully intend to repeat this peel just before the wedding!
    As for the book, I found it an informative read. All your questions about peels and at-home skin care are answered so well--the prose is humorous and often tongue-in-cheek. Makes a girl smile while giving her tons of helpful advice. If you want better, firmer, more beautiful skin, pick this book up and definitely give the peel a whirl! It couldn't be easier!

So there you have it, my darlings! If you would like to try Dana's fabulous peel, you can find it on her website HERE for the price of $41.95 for a full-size, 12 fl oz bottle--that's enough for FORTY peels!

To discover other great products or to learn more about this one, you can follow Dana and The Skin Regime through the outlets below :

Facebook
Twitter
Pinterest


But wait! Dana has generously offered to give away a set of her book and peel to one of my lucky readers--so let's have a FLASH GIVEAWAY! Just comment on this post below with what your biggest problem is with your skin and your email address--I will pick a random winner tomorrow at 1:00 PM EST! Remember, this is live for ONLY 24 hours so hurry, hurry!

***OPEN INTERNATIONALLY***


Until next time,
<3
B


***I received one or more of the products mentioned above for free using Tomoson.com. Regardless, I only recommend products or services I use personally and believe will be good for my readers.***

Hey, ColorSutraa fans! My name is Heather and I can be found over at I Feel Polished! I'm honored to be here today posting for Babi! I have some refreshing summer nail art for you!

I love doing distressed nails. Whenever I really want to do nail art but I don't have a lot of time, I always turn to distressed nails. They are so easy to do and always end up looking awesome! You accomplish distressed nails but polishing your nails a base color and allowing it to dry. Once your base is dry, you choose your first color to distress with. Then, you wipe as much of the polish off of the brush as you can using the neck of the bottle. When you think there can't possibly be any polish left on the brush, you drag it over your base, leaving a streaked line of awesome behind! I tend to do this with two to four colors, but you can do it with as many or as few as you'd like!

For these nails, I began with a base of China Glaze Sun Upon My Skin, a creamy yellow perfect for summer! I used China Glaze Dune Our Thing, Shore Enuff, and If In Doubt, Surf It Out for the distressing!


A special thanks to Babi for letting me take over for her for a day! Enjoy! :)


Hellloooo, Lacquerbeanz! My name is Ariel and I blog over at Lacquer: The Best Medicine! I am so excited to be here posting for Babi, the sweetest, most adorable lady in the blogosphere!

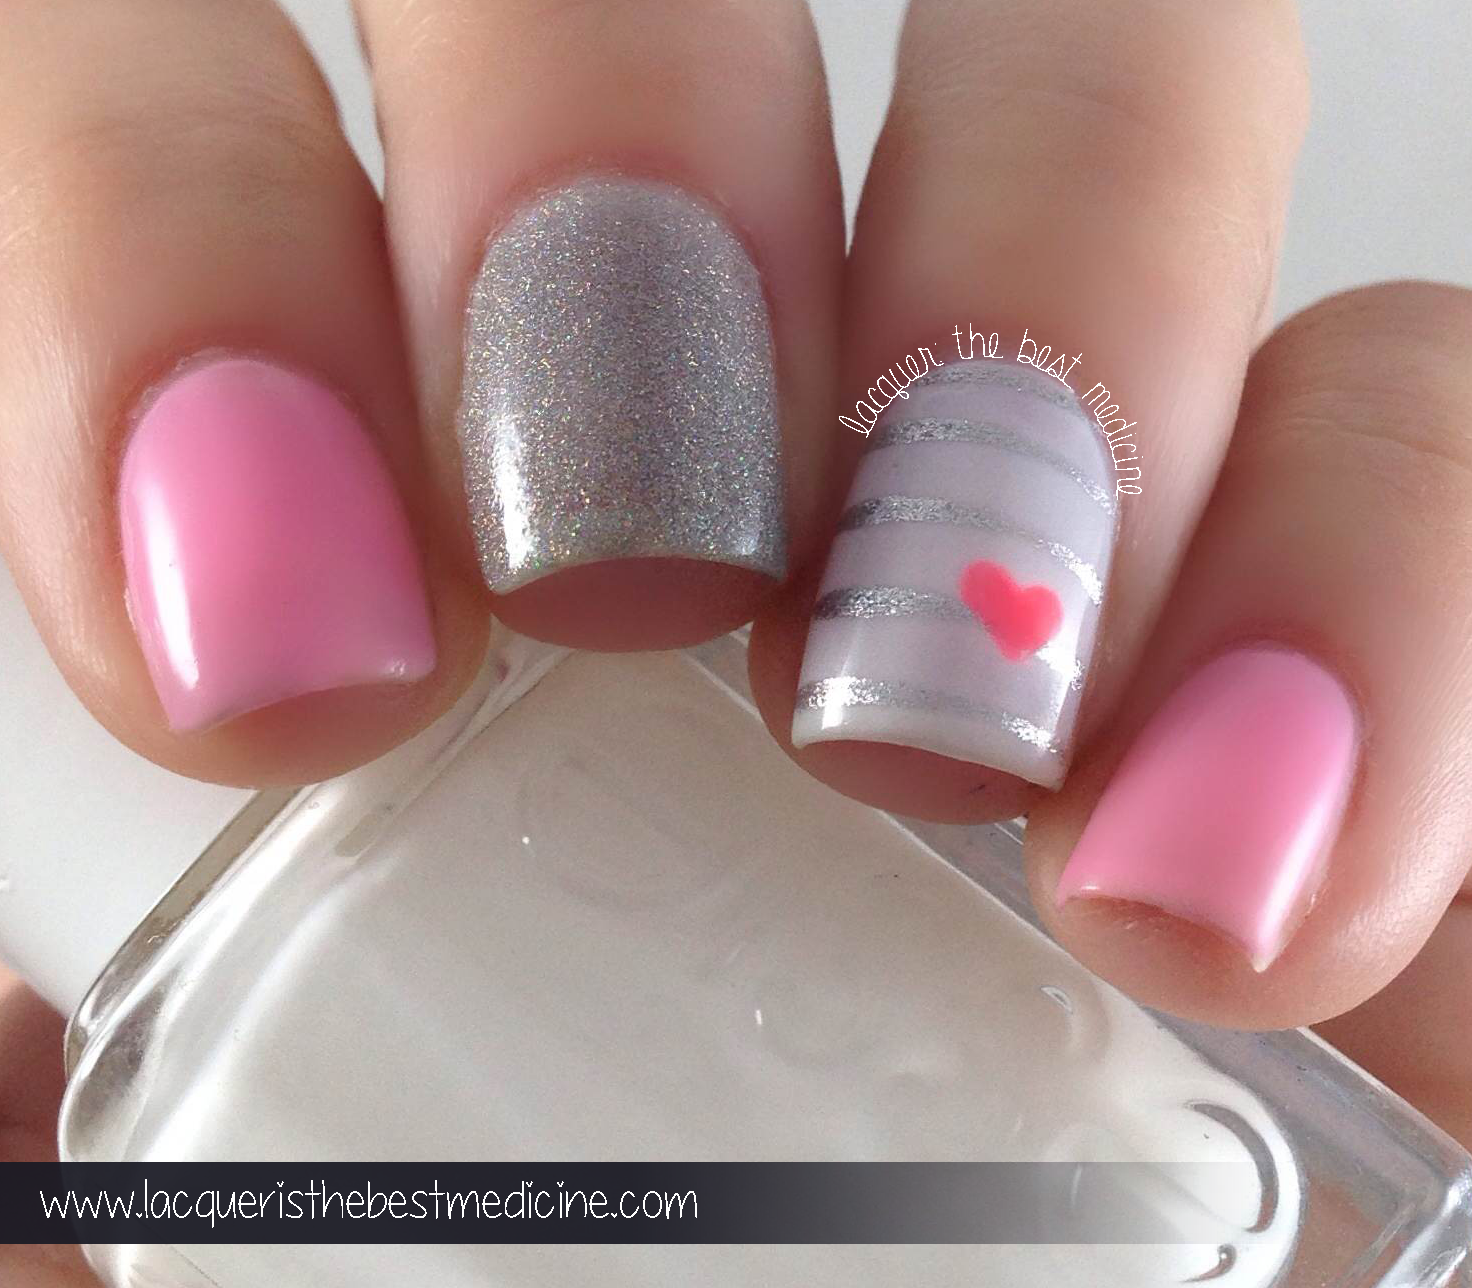
I have a cute, simple nail look to show you today. Let's have a look!


This mani was inspired by amkuch15. I saw her mani on Pinterest here and had to replicate it -- I love it!

The light pink base is a beautiful crelly called Hush made by Lavish Polish. I used my favorite scattered silver holo (Sugar from InDecisive Lacquer) on my middle finger, and Essie Marshmallow for the white base on my accent nail. I freehanded the stripes and the tiny little heart using my SUPER awesome nail art pens I got from Tmart. I topped the whole mani off with my absolute favorite topcoat, HK Girl by Glisten & Glow.


I love this look because it is simple, easy to do, and can be done quickly when you're crunched for time. What do you think?

I hope you enjoyed this mani, and I would love for you to follow me if you'd like to see more! Here are some ways to keep up with my blog:

Blog | Bloglovin' | Instagram | Facebook | Twitter | Pinterest


I Love Nail Polish - Purple Plasma

*Nothing to disclose


Hello polish lovers! I am Amanda from Amanda LovesPolish. I am SO EXCITED to have the opportunity to do a guest blog for Babi! I find them to be fun! Enough about me for now, let's talk polish!


Purple Plasma is apart of the summer collection from I Love Nail Polish.

It was released in May 2014.


I used two flawless coats of this knock out polish for these pictures, no topcoat. Brush was perfect, application was a breeze, dry time was normal. Basically, I had zero issue.


I would describe this as a rich purple polish with a pinkish red shimmer that peaks out at you in certain lights. It has a strong linear finish, which I personally love.

I Love Nail Polish or INLP describes it as: "Purple Plasma is a lusciously saturated electric purple holographic polish... you’ll see how the touch of red and gold sparkle"

Hint... you can click on ILNP and be taken directly to their site... not that I am trying to encourage you to buy or anything... ;)


My final thoughts... I love it, hands down people should buy it. Purple is my favorite color and purple with a strong linear holo makes even the worst days, brighter.

So, now for the fun stuff....

You can find me via my Blog, Instagram and Facebook.


***All thoughts and opinions expressed in this blog are my own.***


Hi there, my darlings! After an entire week of jet lag, intolerable heat and molasses-slow internet, I think I'm finally in a position to start posting from (incredibly) sunny Calcutta! And my very first post is of a collection that is all about celebrating the sun, the heat and the super bright colors of a tropical summer--yes, I'm talking about the Barielle Keys collection for Summer 2014! Wait til you get a glimpse of these 6 vibrant, intensely pigmented, almost-neon shades that are just perfect for a hot, hot summer anywhere around the world!


Before we get started, let's take a minute to discuss the formula and application of these beauties. All six shades are easily opaque in 2 coats, though I prefer three coats, unless mentioned, to bring out the true vibrancy of each shade. Across the board, the formula of these polishes was fabulous--despite being neons or intensely pigmented, they weren't super streaky and leveled out quite nicely as they dried. All the swatches below show 3 smooth coats by itself, topped with 1 thin coat of G&G's HK Girl for added shine. Now comes the fun part...on to swatches!!!


Barefoot in Bermuda is described as "a creamy hot pink". A gorgeous, bright pink that I adore on my complexion!


Hawaiian Sunset is described as a "a shimmery orange" with an almost crelly-like finish. The gold shimmer in this polish is intense and absolutely mesmerizing!


With flash, to better show off that shimmer!


Miami Heat is described as "a sheer jelly red". If you love your reds like me, this one is a must-have!


Panama Piña Colada is described as "a creamy, soft melon yellow". Super bright, super pigmented without all the streaking that neons usually bring with them!


Paradise in the Tropics is described as "a deep fuschia". This shade is quite similar to Barefoot in Bermuda but if you love bright pinks, you know that they are NOT the same! =) Another huge favorite!


Topless in St. Tropez is described as "a creamy pink with a hint of coral". This one also had such a gorgeous hidden shimmer!


With flash, to show off that shimmer!


So there you have it, my darlings! The Keys collection from Barielle! If you want to add any of these beauties to your stash, you can find them on Barielle's website HERE for the price of $8 for a full-size, 0.45 oz bottle. Be sure to follow them through the social media outlets below for all the latest news and updates :

Facebook
Instagram
Twitter
Pinterest

Which of these 6 are your favorites? Or do you need them all? I'd love to hear your opinions in the comments section below!


Until next time,
<3
B


****Products were sent to me for an honest, unbiased review. All opinions are my own.****


Back to Top